You can create Connect Fonts User accounts by importing a formatted list of email addresses and names.
If you have a list of users that you have exported from another source, you may need to perform some clean-up on the list before it is ready for you to import into Connect Fonts. See Importing an exported list for some tips.
The import file must be a comma-separated list. Each line in the list has an email address, first name, and last name. You can’t omit any fields. If you want to invite Adele to join your team, you must include her last name (Adkins).
Save the file in UTF-8 format, with either Windows (CR/LF) or Unix (LF) line endings.
You can use your favorite spreadsheet program to create your list, then save or export it in the appropriate format.
In each row, put the email address in column A, first name in column B, and last name in column C.
| A | B | C | ||
|---|---|---|---|---|
| 1 | superman@dailyplanet.news | Clark | Kent | |
| 2 | queenbey@music.net | Beyoncé | Knowles | |
| 3 | antman@avengers.org | Scott | Lang | |
| 4 | justadele@music.co.uk | Adele | Adkins | |
If you create your list in Microsoft Excel, use File > Save As and set the File Format to CSV UTF-8 to save it in CSV format.
If you create your list in Apple Numbers, make sure to display only three columns, then use File > Export To > CSV to export it in CSV format.
When you export the preceding file it will look something like this:
-
superman@dailyplanet.news,Clark,Kent¬
-
queenbey@music.net,Beyoncé,Knowles¬
-
antman@avengers.org,Scott,Lang¬
-
justadele@music.co.uk,Adele,Adkins
In this case, ¬ represents an end-of line. Some editors may show the paragraph mark, ¶. Note that the last line in the file does not have an end character. Most CSV files will be this way, but Connect Fonts will correctly import a file that has a final end-of-line mark.
To import your list of users into Connect Fonts:
-
Click the
menu next to Invite User and choose Bulk import users.
-
If you already have User accounts but want to remove any that don't exist in your import file, select Remove users not included in import file.
(Connect will only remove User accounts, not Administrators or the License Manager.)
-
Click Upload file, select the file that you want to import, then click Upload.
-
If there are errors in the import file, Connect will show you the errors and won’t perform the import.
-
If the import would result in more accounts than you have licenses for (after accounting for removed Users), Connect will tell you and won’t perform the import.
-
If you have chosen to remove existing User accounts in favor of those in the import file, Connect will prompt you with a list of User accounts that it will remove.
-
If the file imports correctly, the list of users will refresh.
-
After your import succeeds, if you see an odd string of characters where you expect a single accented or otherwise non-English letter, make sure that your file is in UTF-8 format. You may need to re-export the file from your spreadsheet, then re-import it into Connect Fonts.
Extensis will tell new Users via email that you have invited them to use Connect Fonts.
Connect creates new user accounts with Read Only permission and no font libraries assigned.
Importing an exported list
Many people will want to be able to import a list of Connect Fonts users that they exported from another source, such as an Active Directory service.
If you have any control over the source list, try to make sure it has only the fields and rows that you need, and that the field values (Email, First Name, and Last Name) are separated by commas, not tabs or semicolons.
It pays to have a good text editor on hand to review and make minor fixes to text files. If you were given a tab-separated file, for example, it is simple to find-and-replace tab characters with commas.
A customer provided us with an example of a file exported from an Active Directory source. In this case, the file looks like this:
-
Email;Department;Last Name;First Name¬
-
sjones@thecompany.com;Advertising;Jones;Sam¬
-
art.ornott@freelance.net;Marketing;Ornott;Art¬
-
henri@freelance.net;Marketing;Galveston;Hénri¬
-
bsawyer@thecompany.com;Finance;Sawyer;Buzz
(Once again, the ¬ indicates an end-of-line.)
This file has a header row (it tells what data each column holds), and four columns. The extra column is the second one, “Department.” Also, the “First Name” and “Last Name” columns are in reverse order of what we need.
What we’ll do to “fix” this is take the original .csv file, open or import it into a spreadsheet, then export it as a new, correctly formatted .csv file, ready for you to import into Connect Fonts.
Fixing the import file in Numbers
While the Numbers application is only available for Apple devices, the iCloud version works perfectly well from Windows, and the process for fixing the file is almost identical to the desktop version.
-
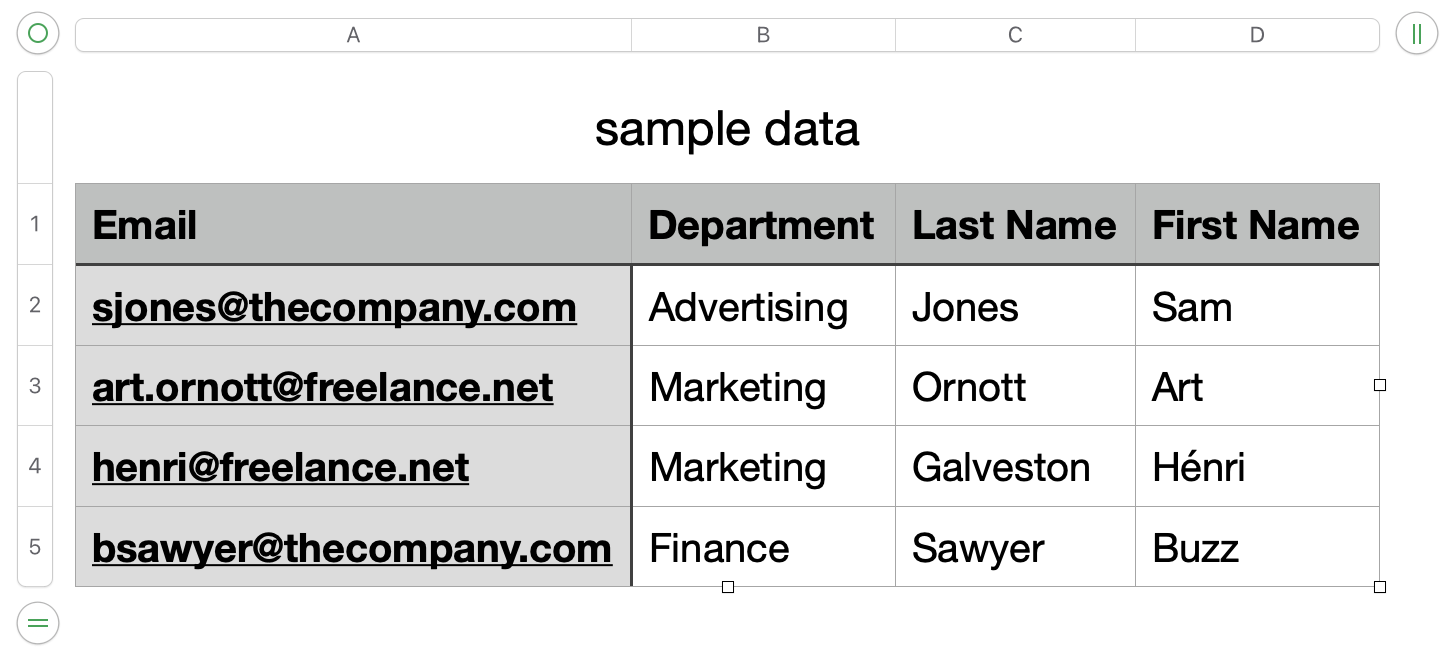
Right-click the file and choose Open With > Numbers (or Numbers.app).
Numbers should recognize the semicolon separator, and display the data:
-
To delete the “Department” column, move the mouse pointer over the column B head so the ˅ menu arrow appears, click the ˅, then choose Delete Column from the menu.
As soon as you make a change to the data, Numbers will give the spreadsheet a temporary name with the extension
.numbers. -
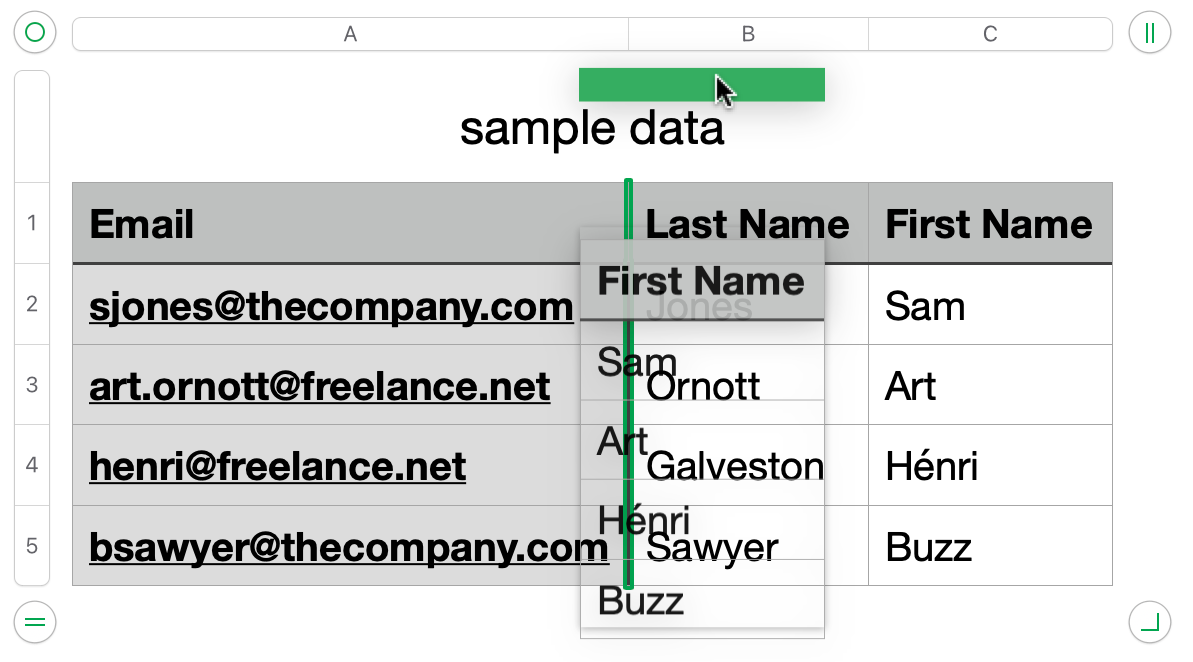
Click the (new) column C head, then drag column C between the current columns A and B.
-
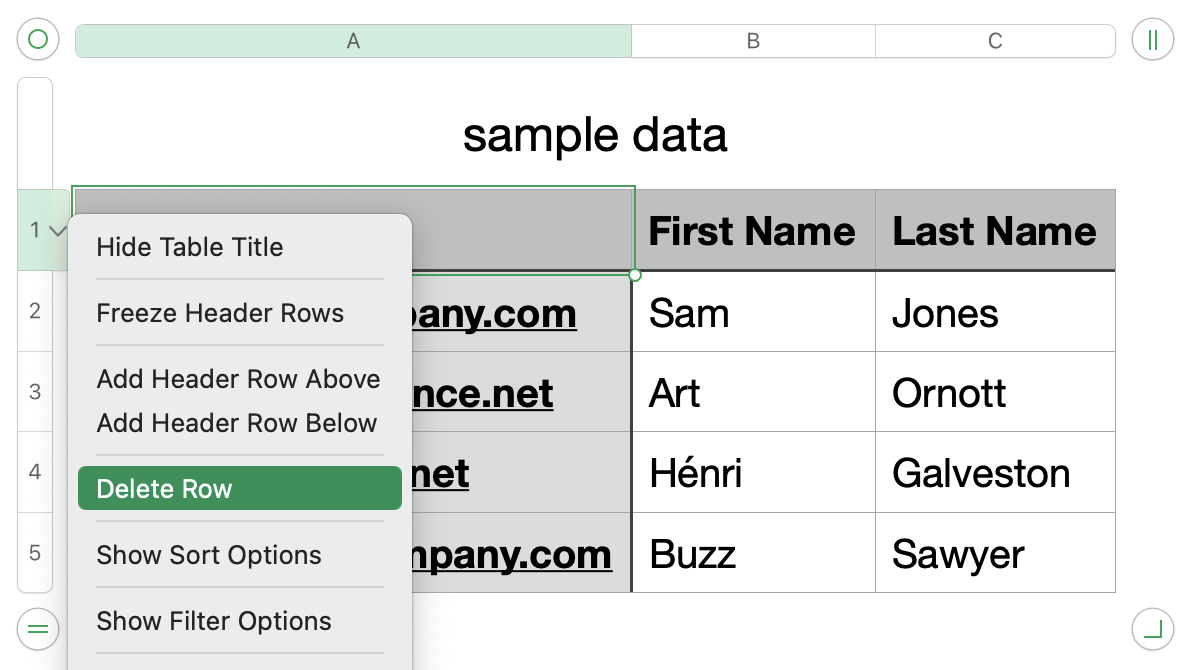
Since the first row in the spreadsheet is not actual data, we need to delete it. Move the mouse pointer over the row label until the ˅ menu arrow appears, click the arrow, then choose Delete Row from the menu.
-
Choose File > Export To > CSV. In the dialog, click Next, then save the new file (be careful not to overwrite your original file).
When you quit Numbers, it will prompt you to save the new file. You can safely click Delete.
Fixing the import file in Excel
-
Start Excel and create a new blank workbook.
-
Click the Data ribbon.
-
In Excel for Windows, click From Text/CSV in the Get & Transform Data section.
In Excel for Mac, click Get Data (Power Query), then click Text/CSV.
-
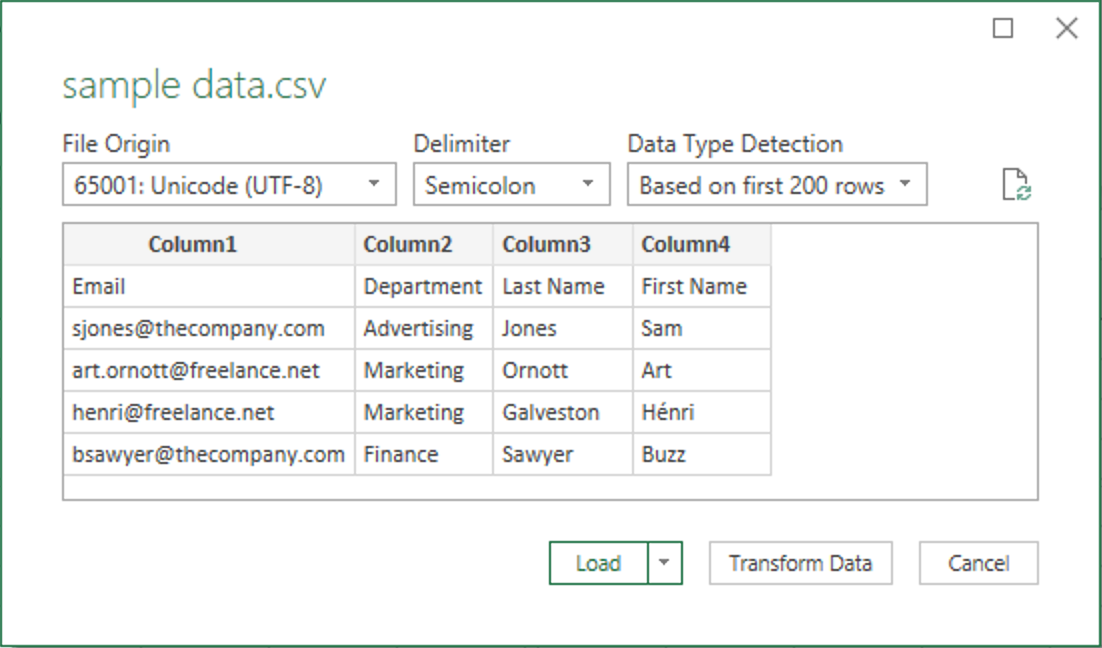
In Excel for Windows, select the file to import and click Open.
In Excel for Mac, click Browse, select the file, click Get Data, then click Next.
-
Click Load to load the data into the spreadsheet.
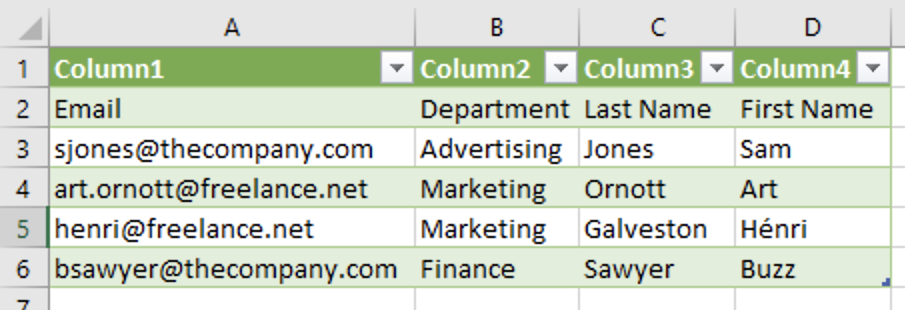
Using our example data, Excel creates a sheet with 4 columns and 6 rows.
-
To remove the “Department” column, right-click the B column head and choose Delete from the menu.
-
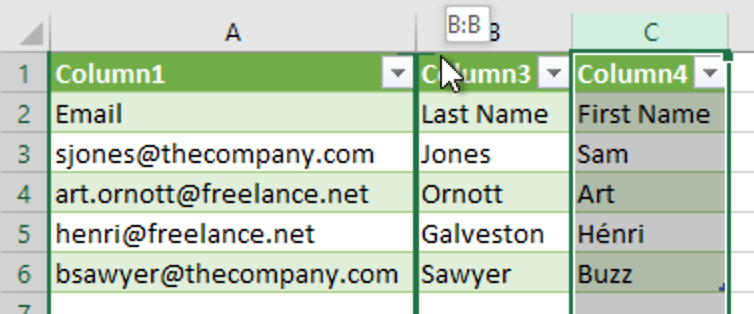
To move the “First name” column to the second position, click the column C head, hold down the Shift key, then move the mouse pointer between the column head and the top of the first row.
In Excel for Windows, the mouse pointer will become a 4-way arrow.
In Excel for Mac, the pointer turns into a hand.
Drag column C until you see a solid divider between column A and column B, then release the mouse button.
-
Click inside the data area of the spreadsheet, then click the Table Design ribbon (called just Table in Excel for Mac).
-
Deselect the Header Row option.
Excel clears the first row of the spreadsheet.
-
Right-click the row head for the first row and choose Delete from the menu.
-
Do the same to remove the new first row (which reads Email, First Name, Last Name).
The spreadsheet data now matches the format we need to import into Connect Fonts.
-
In Excel for Windows, click File, click Save As, click Browse, enter your name for the modified data file, choose CSV UTF-8 from the Save as type menu, then click Save.
In Excel for Mac, choose File > Save As, enter a file name, choose CSV UTF-8 from the File Format menu, then click Save.
(If Excel shows a warning dialog, click OK to proceed.)